Certbot을 이용한 무료 인증서 (Let's Encrypt) 발급, 자동갱신, 자동 설치 방법에 대한 매뉴얼이며 Windows Server 기반으로 작성되었다. Certbot은 Let's Encrypt 인증서를 자동으로 발급, 갱신 및 관리하기 위한 도구이다. Let's Encrypt는 무료로 SSL/TLS 인증서를 제공하는 자동화된 인증 기관이다. Certbot은 커맨드 라인 인터페이스를 통해 사용되며, 다양한 웹 서버 및 운영 체제와 호환된다.
[목차]
1. Certbot 설치
- 공식사이트 : https://certbot.eff.org/
Certbot
Tagline
certbot.eff.org
- 설치파일 : 윈도우용 설치 파일 다운로드
Certbot Instructions
Tagline
certbot.eff.org
- 설치과정
exe 파일을 받아서 install을 진행하면 된다.

- 설치 확인
Certbot 은 powershell이나 cmd로 실행하면 된다. help 커맨드를 입력해 확인해 볼 수 있다.
certbot -help
2. Certbot 사용 방법
옵션이 상당히 많은데 자세한 내용은 아래 페이지에서 확인가능하다
https://eff-certbot.readthedocs.io/en/stable/
Welcome to the Certbot documentation! — Certbot 2.6.0 documentation
© Copyright 2014-2018 - The Certbot software and documentation are licensed under the Apache 2.0 license as described at https://eff.org/cb-license. Let's Encrypt Status Revision 013621d0.
eff-certbot.readthedocs.io
- 인증서 발급 방법
- 예제 옵션의 의미 :
- --manual : 수동으로 인증서를 발급한다는 의미
- --preferred-challenges dns : DNS 도메인 인증 방식을 선택한다는 의미
- -d : 발급 대상 도메인
- 예제 옵션의 의미 :
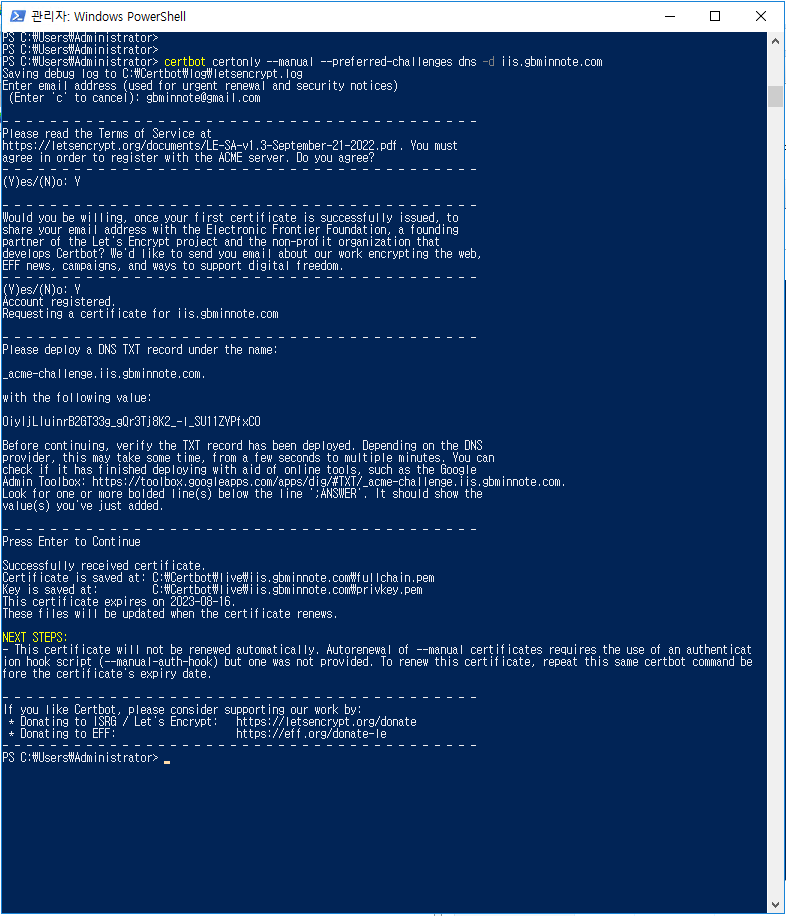
certbot certonly --manual --preferred-challenges dns -d iis.gbminnote.com발급 과정 중 대화형 메시지 가 나오는데 DNS TXT 레코드 설정 하여 인증을 하고, 사용 동의, 뉴스레터 메일주소 등록등을 요구한다. 입력 후 진행 한다. DNS 인증설정 확인은 은 표기된 대로 입력하고 nslookup, dig 등을 이용해 입력이 확인 인을 하고 진행한다.
- DNS 체크 방법
[root@rocky9 ~]# dig _acme-challenge.iis.gbminnote.com TXT +short
"OiyIjLIuinrB2GT33g_gQr3Tj8K2_-l_SU11ZYPfxC0"- DNS 등록 후 발급화면

- 발급된 인증서는 C:\Certbot\archive\도메인명\ 경로에 저장된다.
PS C:\Users\Administrator> ls C:\Certbot\archive\iis.gbminnote.com


    디렉터리: C:\Certbot\archive\iis.gbminnote.com


Mode                LastWriteTime         Length Name
----                -------------         ------ ----
-a----     2023-05-18  오후 10:17           1574 cert1.pem
-a----     2023-05-18  오후 10:17           3749 chain1.pem
-a----     2023-05-18  오후 10:17           5323 fullchain1.pem
-a----     2023-05-18  오후 10:17            241 privkey1.pem
인증서와 체인 인증서와 개인키 모두 pem 형식으로 발급되고 certbot으로는 윈도우 설치 포맷인 pfx 형식으로 발급이 되지 않는다. crt 파일로 변경하여 인증서 정보를 체크해 볼 수 있다.

- 인증서 갱신
certbot의 간단한 커맨드 하나로 인증서 갱신이 되며 만료 30일 이하일 경우 갱신이 가능하다.
certbot renew- 인증서 변환
Windows OS에 인증서를 설치하려면 인증서 파일을 PKCS#12(.pfx) 형식으로 변환해야 한다. 윈도우에서 기본적으로 openssl 사용이 안되기 때문에 별도로 설치해야 사용해야 한다. 사용 방법과 pfx 파일의 변환 방법에 대한 자세한 내용은 이전에 작성한 글을 참고해 볼 수 있다.
PS C:\Users\Administrator> cd C:\Certbot\archive\iis.gbminnote.com
PS C:\Certbot\archive\iis.gbminnote.com> openssl pkcs12 -export -out D:\ssl\iis.gbminnote.com.pfx -inkey privkey1.pem -i
n cert1.pem -in fullchain1.pem
Enter Export Password:
Verifying - Enter Export Password:
cygwin - Windows 에서 Linux 느낌을 받으세요! Linux 개발 환경
Get that Linux feeling - on Windows 공식사이트에 있는 문구이다. cgwin은 Microsoft Windows에서 POSIX (유닉스 및 리눅스와 유사한) 호환성을 제공하는 오픈 소스 소프트웨어 패키지다. 윈도우에서 유닉스 및
gbminnote.com
[Linux command] openSSL 명령어 사용법
openssl 명령어 자주 사용되는 예제 정리 SSL 인증서 형식 변환, key. csr 생성, SSL 모듈 체크 방법 등 자주 사용 하는 openssl 명령어와 예제를 정리하였다. 1. key 생성 (RSA 알고리즘을 사용하여 2048bit 개
gbminnote.com
3. 인증서 자동 갱신
윈도우 버전의 certbot 은 설치 시 스케쥴러에 자동 갱신 스케줄러가 등록되기 때문에 설정내용을 확인 후 원하는 관리 방식으로 변경해서 실행해 주면 된다.


스케줄러가 정상동작 안 한다면 작업 계정 설정을 재설정해주면 된다.

4. SSL 자동설치
- 작업 프로세스 설계 및 구현
certbot 은 pem 형식으로 발급되기 때문에 윈도우에서 자동 설치를 구현하려면 별도의 작업을 필요로 한다. 구현프로세스 : 인증서 자동갱신 → PKCS#12 (.pfx 변환) → IIS설치 자동 갱신은 certbot → pfx 변환 후 IIS에 설치 및 바인딩 은 powershell 스크립트로 처리했다.
# Step 1 : 인증서 md5sum 체크 및 기록
$certPath = "C:\Certbot\archive\iis.gbminnote.com\cert1.pem"
$md5sumFile = "C:\Certbot\archive\iis.gbminnote.com\cert1_md5.txt"

$md5sum = Get-FileHash -Path $certPath -Algorithm MD5 | Select-Object -ExpandProperty Hash
$previousMd5sum = $null

if (Test-Path $md5sumFile) {
    $previousMd5sum = Get-Content $md5sumFile
}

if ($md5sum -eq $previousMd5sum) {
    Write-Host "md5sum 값이 일치합니다. 프로그램을 종료합니다."
    Exit
}

$md5sum | Set-Content $md5sumFile

# Step 2 : pfx 파일 변환
$pfxPath = "D:\ssl\iis.gbminnote.com.pfx"
$privkeyPath = "C:\Certbot\archive\iis.gbminnote.com\privkey1.pem"
$certPath = "C:\Certbot\archive\iis.gbminnote.com\cert1.pem"
$fullchainPath = "C:\Certbot\archive\iis.gbminnote.com\fullchain1.pem"
$websiteName = "gbminnote"
$domain = "iis.gbminnote.com"
$port = "443"
$certStoreLocation = "Cert:\LocalMachine\My"

$opensslCommand = "openssl pkcs12 -export -out '$pfxPath' -inkey '$privkeyPath' -in '$certPath' -in '$fullchainPath' -passout pass:`""""

try {
    Invoke-Expression -Command $opensslCommand
    Write-Host "pfx 파일이 성공적으로 생성되었습니다. 경로: $pfxPath"
} catch {
    Write-Host "pfx 파일 생성에 실패했습니다."
}

# Step 3 : 인증서 설치 및 바인딩
$certificate = Import-PfxCertificate -FilePath $pfxPath -CertStoreLocation $certStoreLocation -Exportable

$bindingInformation = "*:443:$domain"
$binding = Get-WebBinding -Name $websiteName | Where-Object { $_.bindingInformation -eq $bindingInformation }

if ($binding) {
    Write-Output "SSL binding already exists for $domain"
} else {
    Remove-WebBinding -Name $websiteName -Port $port -Protocol "https"
    $port = 443  # 포트 번호 설정
    $binding = New-WebBinding -Name $websiteName -Protocol "https" -Port $port -HostHeader $domain
}

if ($binding) {
    $certificateThumbprint = $certificate.Thumbprint
    $binding.AddSslCertificate($certificateThumbprint, "My")
    $binding | Set-WebBinding -Name $websiteName -PropertyName "SslFlags" -Value 1
    $binding | Set-WebBinding -Name $websiteName -PropertyName "SslCertificateThumbprint" -Value $certificateThumbprint
    Write-Output "SSL binding created for $domain"

    # 인증서 선택
    $selectedCert = "Cert:\LocalMachine\My\$certificateThumbprint"
    $certUtilCommand = "CertUtil -store -user My $certificateThumbprint"

    Write-Output "인증서가 선택되었습니다."
} else {
    Write-Output "Failed to create SSL binding for $domain"
}
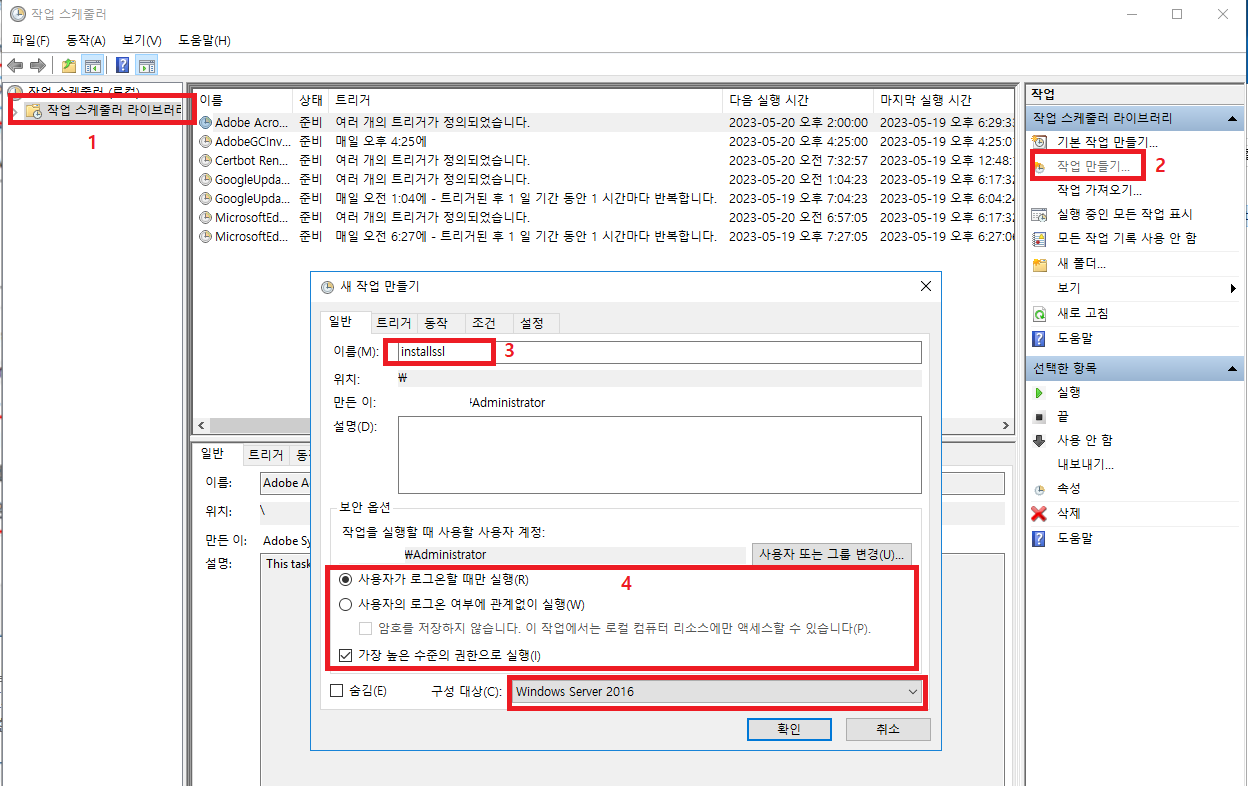
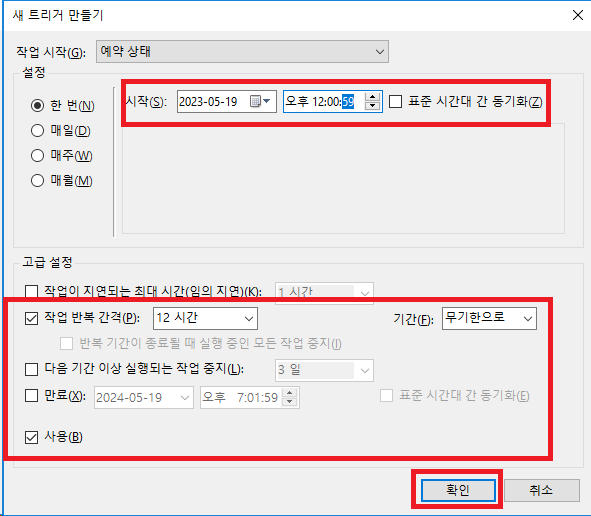
- 스케쥴러 등록
새 작업 만들기

트리거탭

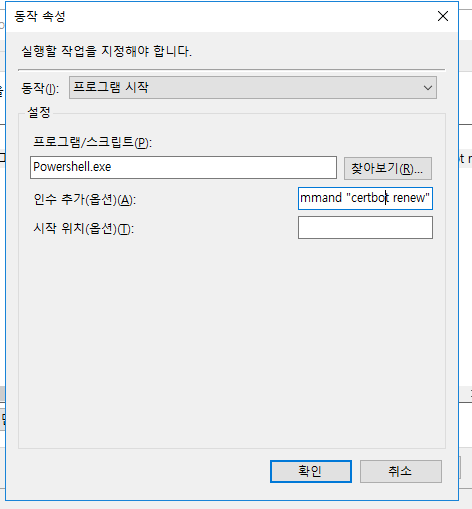
동작 속성 설정
스크립트 : C:\Windows\System32\WindowsPowerShell\v1.0\powershell.exe
인수추가 : -ExecutionPolicy Unrestricted -File ""C:\workingscript\installssl.ps1"

등록된 스케줄러를 수동으로 실행해서 동작 확인.

이와 같은 방법으로 윈도우 서버에서 Certbot 을 이용해 Let's Encrypt 무료 인증서 발급 부터 갱신, 자동 설치 까지 할수 있는 시스템을 구축할수 있다 시스템 환경에 따라 처리 방법은 다를수 있으니 기본 프로세스는 이글의 내용다 크게 달라지지 않는다.

